Zebrafish agarose mounting: a step-by-step imaging plan
A live zebrafish brain is easy to image only after it stops moving. That is the bottleneck. If the larva drifts, bends, or generates residual muscle contractions during acquisition, the microscope records motion before it records neural activity.
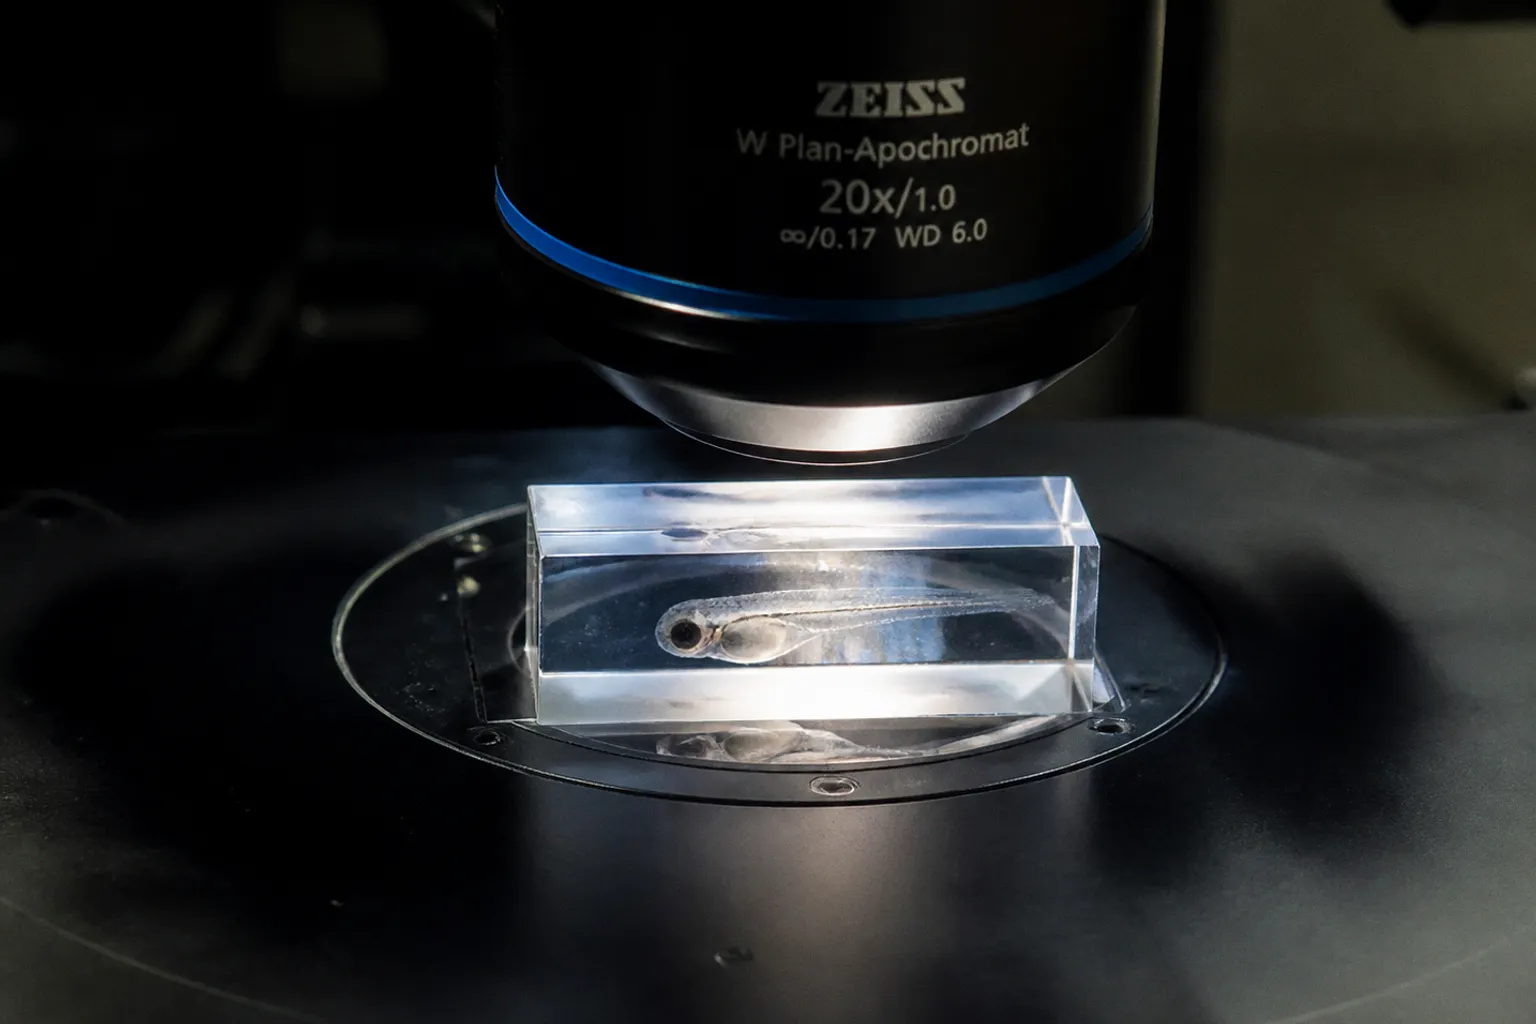
The result is not a weak image. It is a damaged dataset: blurred planes, unstable regions of interest, and calcium traces that cannot be separated cleanly from movement artifacts.
The practical solution is a controlled larval zebrafish agarose embedding protocol built around low-melting-point agarose, tricaine anesthesia, deliberate orientation, and a mount matched to the imaging system. Each variable has a mechanical role. Agarose stabilizes the animal. Tricaine suppresses movement. Orientation protects the optical path. Temperature preserves tissue viability while the gel remains workable.
This is not a single universal recipe. A dorsal brain preparation for upright calcium imaging is not equivalent to a capillary mount for light-sheet fluorescence microscopy. Use the same logic, but calibrate the parameters to the hardware and the acquisition window.
Start with the imaging geometry
Before preparing agarose, define the volume that must remain accessible. The mounting method follows the optical geometry, not the other way around.
For whole-brain functional imaging, the usual target is the dorsal head. The larva must remain stable enough for repeated optical sections while the brain stays exposed to the objective’s working distance and illumination path. For tail development or elongation studies, the region of interest shifts caudally. A mount that gives excellent access to the brain may obstruct the tail, and a mount optimized for the tail may leave the head at a poor angle.
Three questions determine the preparation:
- Which region must remain optically clear throughout the acquisition?
- Does the microscope require an open dish, an inverted geometry, or a capillary?
- Will the larva remain fully embedded, or must part of the body retain freedom for a behavioral or physiological readout?
Answer these before mixing the gel. They determine concentration, volume, orientation, and whether excess agarose should be removed after setting.
The core material is low-melting-point agarose, or LMPA. Standard high-melting agarose is not an interchangeable substitute for live mounting. The thermal burden is higher, and the working window is less forgiving. Prepare LMPA in E3 medium or the system medium used by the experiment.
A practical concentration range is 0.8% to 2.0%:
| Mounting requirement | LMPA range | Mechanical result | Typical use |
|---|---|---|---|
| Lower stiffness and extended optical preparation | 0.8%–1.0% | Softer matrix, easier positioning and trimming | diSPIM or LSFM long-term mounting |
| Balanced stabilization | Around 1.0%–1.2% | Moderate restraint without excessive compression | General live imaging preparations |
| Rigid immobilization | 1.2%–2.0% | Stronger mechanical fixation | Upright imaging, rigid stabilization, capillary loading |
| Capillary-based setup | Selected within the range | Must extrude and set cleanly inside the capillary | Light-sheet systems using glass capillaries |
The range is a starting envelope, not a specification. A lower concentration can reduce mechanical stress but may allow movement. A higher concentration can improve stability but make orientation and later trimming more difficult. If the animal moves, first isolate whether the problem is anesthetic, gel stiffness, orientation, or mounting hardware. Do not increase agarose concentration automatically.
Agarose is not the immobilization strategy by itself. It is the mechanical layer that preserves the geometry created by anesthesia and positioning.
Prepare the medium without creating thermal stress
LMPA must be molten when the larva is embedded and firm enough to hold position shortly afterward. That creates a narrow handling problem: the solution must remain liquid, but it must not expose the animal to unnecessary heat.
Keep molten aliquots at approximately 37–42°C in a heat block or water bath. The upper end of that range is not a target temperature for the larva. It is a practical holding range for the liquid agarose before mixing and mounting. The working solution should be handled with enough control to prevent thermal shock.
Use small aliquots. Large volumes cool unevenly and extend the time the preparation remains exposed to a warm medium. Small aliquots also make it easier to repeat a preparation without repeatedly reheating the entire stock.
A stable preparation sequence looks like this:
1. Prepare LMPA in E3 or the relevant system medium at the concentration selected for the imaging geometry.
2. Melt it completely, then hold it in the 37–42°C range.
3. Prepare the anesthetic-containing medium separately.
4. Transfer the required amount of anesthetic into the agarose medium and into the overlay solution used during imaging.
5. Keep the final mixture workable while avoiding prolonged exposure to elevated temperature.
6. Mount immediately after the larva reaches the required immobilization state.
Tricaine, also called MS-222 or ethyl 3-aminobenzoate methanesulfonate, is commonly used before embedding. The supplied stock reference is a 0.4% solution, equivalent to 4 mg/ml, buffered to pH 7.0. The working concentration and exposure conditions should follow the established protocol for the developmental stage, assay, and institutional requirements. Do not treat the stock concentration as the final imaging concentration.
The same anesthetic condition must be maintained after embedding. If the overlay lacks tricaine while the agarose contains it, the larva can recover movement at the interface. That produces a common failure pattern: the body appears fixed, but the eyes, jaw, tail, or trunk shift during acquisition. Add the anesthetic to both the agarose medium and the imaging solution.
Do not improvise by removing tricaine from a functional imaging preparation unless another validated immobilization method is in place. Alternatives may include α-bungarotoxin or spinal cord transection, but these change the preparation and can alter the physiological or behavioral interpretation. They are not simple substitutions.
Control pigment before it blocks the signal
Pigment is an optical problem, not a cosmetic one. In fluorescent neural imaging, developing pigmentation can obstruct excitation and emission paths, reduce contrast, and create uneven background across the specimen.
Embryos or larvae are often treated with 0.003% w/v 1-phenyl-2-thiourea, or PTU, in embryo medium during early development to limit pigment formation. Apply the treatment according to the developmental and experimental protocol. The point is to reduce optical obstruction before the imaging session, not to compensate for poor signal later with more illumination.
PTU does not correct motion, poor orientation, or an unsuitable objective geometry. It only addresses pigmentation. Keep the variables separate:
- PTU manages optical obstruction from pigment.
- Tricaine manages active movement.
- Agarose manages mechanical displacement.
- Orientation manages access to the region of interest.
- The microscope configuration manages illumination and detection.
When these functions are mixed together, troubleshooting becomes slow. When they are isolated, the failure is usually visible.
Position the larva under the stereomicroscope
The embedding step is a positioning operation. The larva must be placed before the agarose sets, and the position must remain stable after the gel becomes solid.
Work under a stereomicroscope with fine tools such as minutien pins or fine needles. Avoid pushing the larva through the gel. Instead, use the tool to adjust the body axis, rotate the head, and clear the region that must face the objective.
For dorsal brain imaging, orient the head so the dorsal surface remains accessible and the brain lies within the intended optical plane. Check the angle of the body, not only the angle of the head. A small rotation of the trunk can tilt the brain relative to the imaging axis and create a depth gradient across the field. That gradient may appear to be an optical problem when it is actually a mounting error.
For tail imaging, preserve a straight segment through the region of interest. A curved tail introduces a second problem: the biological structure changes position across z-planes, and segmentation becomes more difficult. Use the lowest concentration that still gives the required stability when the study depends on tissue extension or morphology.
A controlled positioning sequence:
1. Place a small volume of anesthetic-containing molten LMPA in the mounting chamber or dish.
2. Transfer the anesthetized larva into the liquid gel.
3. Align the larva with the fine tool before the gel begins to set.
4. Rotate the region of interest toward the objective or light sheet.
5. Remove trapped bubbles from the optical path.
6. Allow the agarose to set without disturbing the chamber.
7. Add the anesthetic-containing overlay medium once the mount is stable.
8. Inspect the region of interest again at the microscope before starting the acquisition.
Bubbles deserve their own control. A bubble between the objective path and the brain can mimic a local loss of fluorescence or create a sharp distortion in the optical section. If the image contains a persistent round void, irregular scattering, or a sudden loss of signal at one depth, inspect the mount before changing the acquisition settings.
Trim for access, not for appearance
Fully embedding the animal is not always the end of the preparation. Excess agarose around the target region can reduce optical access, interfere with the working distance, or force the objective to image through an unnecessarily thick gel layer.
After setting, excess agarose may be excised around the region of interest using a knife or razor blade. For brain calcium imaging, this often means clearing material around the dorsal head. For tail studies, the cut is placed to expose the caudal region without destabilizing the rest of the larva.
Trim conservatively. The goal is not to expose as much of the animal as possible. The goal is to remove material that blocks the optical path while preserving the mechanical support needed for stable acquisition.
A useful test is geometric: can the objective reach the intended focal range without contacting the chamber or forcing an extreme angle? If not, trim the mount or revise the initial orientation. Do not compensate for a poor mount by accepting a distorted optical configuration.
The choice of concentration and trimming are linked. A 0.8%–1.0% matrix is easier to cut and may suit long-term diSPIM or LSFM mounting. A 1.2%–2.0% matrix gives greater rigidity, but the cut must be more deliberate. The correct setting is the minimum stiffness that holds the animal through the planned acquisition.
The best mount is not the stiffest mount. It is the least restrictive mount that keeps the region of interest motionless for the full recording.
Adapt the mount to light-sheet microscopy
Light-sheet imaging introduces a different mechanical constraint. The specimen must enter the chamber in a defined position, often through a glass capillary, while remaining optically accessible to the illumination sheet and detection objective.
For a capillary-based light-sheet setup, larvae are commonly mounted inside glass capillaries using agarose and extruded slightly into the sample chamber. A representative format is a 20 µl glass capillary with a 1 mm inner diameter. The exact capillary and chamber design depend on the instrument.
The loading process must preserve three conditions:
- The larva remains aligned with the intended light-sheet axis.
- The agarose column contains no bubble across the imaging region.
- The extruded sample forms a stable interface rather than a loose plug that shifts in the chamber.
Use a concentration that extrudes cleanly and sets firmly enough to prevent drift. If the column fractures during extrusion, the gel may be too weak, too cool, or mechanically disturbed during loading. If the larva cannot be positioned without deformation, the matrix may be too stiff or the loading sequence too slow.
Do not assume that a dish preparation can be transferred directly to a capillary. In an upright or inverted dish, gravity, chamber depth, and objective access shape the mount. In a capillary LSFM setup, the diameter of the column and the extrusion position become part of the optical design. The same larva can image well in one geometry and fail in another without any biological change.
For diSPIM and other long-term light-sheet preparations, lower LMPA concentrations in the 0.8%–1.0% range are often favored because they provide stability while reducing unnecessary restriction. This does not establish a universal standard. Verify the result against the actual acquisition duration, motion tolerance, and sample orientation required by the system.
Diagnose failure by isolating the variable
A poor image rarely has one obvious cause. Separate the symptoms before changing the protocol.
The larva moves during acquisition
First inspect the anesthetic condition. Confirm that tricaine was included in both the embedding medium and the overlay solution. Then inspect the mount. A soft matrix, incomplete setting, or insufficient contact around the body can permit whole-body drift.
If the body is stable but the head moves, the problem is often local. Recheck head orientation and the amount of free agarose around the skull. If only the tail moves, do not immediately increase concentration for the entire preparation. Modify the support around the tail or revise its alignment.
The brain is stable but the image remains blurred
This can be a plane and geometry problem rather than a movement problem. Check whether the dorsal surface is angled relative to the objective. Confirm that excess agarose is not forcing the objective to image through a thick or oblique layer. Look for bubbles and inspect the sample interface.
For repeated functional imaging, quantify motion with a fixed anatomical landmark. Use the same landmark across the time series and separate translational drift from local deformation. A mount that appears acceptable in a single frame may fail across the full recording.
The larva shows signs of thermal stress
Review the handling temperature of the molten LMPA and the time spent before embedding. The 37–42°C range is a holding range for the liquid medium, not permission to expose the animal to uncontrolled heat. Use smaller aliquots, reduce handling delays, and verify that the mixture is not significantly warmer than intended when it contacts the larva.
Do not solve a thermal problem by using high-melting agarose. Live embedding requires LMPA. The material choice is a biological constraint.
The preparation is stable but optical access is poor
Inspect pigment, gel thickness, orientation, and bubbles separately. If pigmentation obscures the neural signal, review the PTU treatment. If the signal disappears at a consistent interface, inspect the mount. If the entire brain is outside the useful field, revise the initial orientation rather than relying on post-acquisition correction.
The capillary mount shifts after loading
Check the gel column and the extrusion point. A loose interface can move when the capillary enters the chamber or when the surrounding medium is exchanged. A fractured agarose column can also release the specimen gradually. Increase mechanical stability only as much as needed; excessive stiffness can make loading and alignment less controllable.
Build a reproducible preparation record
The mount is part of the experiment. Record it with the same discipline used for genotype, developmental stage, and imaging settings.
At minimum, log:
- LMPA concentration and medium composition.
- Temperature used to hold the molten agarose.
- Tricaine stock and working conditions.
- Whether anesthetic was present in both the gel and overlay.
- PTU treatment and developmental timing.
- Mount geometry: dish, chamber, or capillary.
- Capillary dimensions when applicable.
- Orientation of the head, trunk, and region of interest.
- Any trimming performed after setting.
- The first visible motion artifact and the time point at which it appeared.
- Whether the sample remained physiologically suitable for the planned acquisition.
This record makes optimization measurable. If one preparation fails, you can change one parameter. If several variables change at once, the result is not calibration. It is noise.
A simple optimization sequence is more reliable than a broad redesign:
1. Fix the imaging geometry.
2. Keep the anesthetic condition constant.
3. Test the lower end of the appropriate LMPA range.
4. Increase stiffness only if motion persists.
5. Revise orientation before making large concentration changes.
6. Trim excess gel when optical access, not stability, is the limiting factor.
7. Repeat the same acquisition window and quantify drift.
The unknowns should remain visible. There is no universal agarose concentration that performs identically in inverted, upright, diSPIM, and capillary light-sheet systems. Long-term survival after full embedding also depends on conditions that are not captured by the gel percentage alone. Duration, temperature, medium exchange, anesthesia, and access to movement all affect the preparation.
A final troubleshooting parameter set
Before acquisition, verify the mount against the actual experiment rather than against a generic protocol.
- Material: low-melting-point agarose, not high-melting agarose.
- Concentration: selected within the 0.8%–2.0% working range for the required stiffness.
- Temperature: molten aliquot controlled in the 37–42°C range before mounting.
- Anesthesia: tricaine/MS-222 prepared with the required pH control and included in both the gel and overlay.
- Pigment control: 0.003% PTU used when required for fluorescent neural imaging.
- Orientation: region of interest aligned to the objective or light sheet.
- Optical path: no bubble or unnecessary gel thickness across the target.
- Stability: no visible drift at the head, trunk, or tail during the planned acquisition window.
- Geometry: dish, chamber, or capillary selected for the microscope rather than copied from another setup.
- Record: every parameter logged so the next change is deliberate.
A larval zebrafish immobilization protocol succeeds when it preserves three things at once: position, optical access, and biological condition. Remove one, and the dataset becomes harder to interpret. The solution is not more gel or more aggressive anesthesia by default. It is a calibrated mount in which each component performs one defined job.